Recover Android Audios
How to Restore Deleted Audio Files from Android Phone
Enjoying music is a great way to relax yourself. Your Android phone may store a lot of music, light music, exciting music, pop songs, classical songs, and more. It is convenient to listen to music on your mobile phone anywhere. However, there are various situations may cause your music get deleted or lost. Now, this article will show you a easily way to restore deleted music from Android.
Once you delete your important data from Android phone, you had better recover them as soon as possible, to prevent data from being overwritten and you couldn’t recover them any more. Android Data Recovery is the wonderful software for Android users to restore the previous data including songs, videos, photos, messages and other contents. This software can support almost all brands of Android mobile phones, including Samsung, HTC, LG, Huawei, Xiaomi, Google, Oneplus, and etc. It's suitable for mistaken deletion, device crashed, smashed or broken, OS upgrade or device reset etc. It can fix Android system like recovery mode, black-screen, white-screen and more, it also can back up and restore Android data in one-click.
Easily to get back lost music from Android phone with the help of Android Data Recovery software. Follow the steps to have a try.


How to Undelete Music/Audios from Android Phone
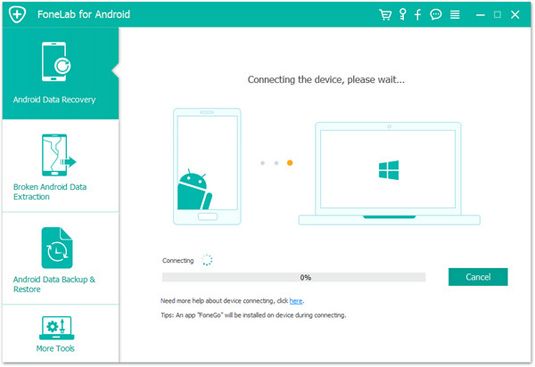
Step 1. Connect Android Device to PC
Run the Android data recovery software on your computer and switch to the mode of "Android Data Recovery". Link your Android smartphone to computer via USB cable, you will see a primary window.
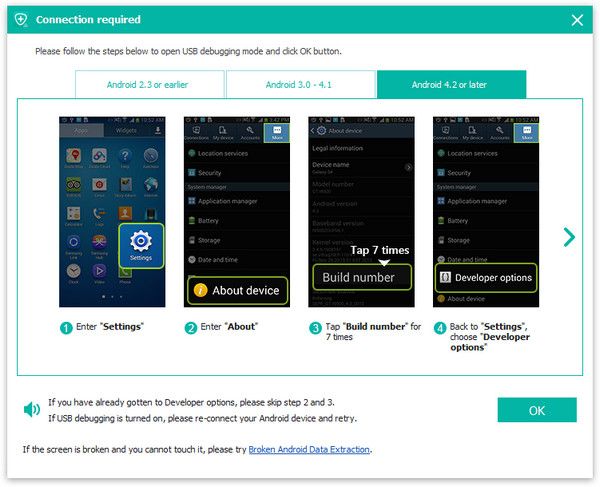
Step 2. Enable USB debugging
Now you will see a tips to enable usb debugging if you don't open it before, else you can skip this step, different ways are for different Android system.
1. For Android 2.3 or earlier: Enter "Settings" < Click "Applications" < Click"Development" < Check "USB debugging".
2. For Android 3.0 to 4.1: Enter "Settings" < Click "Developer options" < Check "USB debugging".
3. For Android 4.2 or newer: Enter "Settings" < Click "About Phone" < Tap "Build number" for several times until getting a note "You are under developer mode" < Back to "Settings" < Click "Developer options" < Check "USB debugging".
Step 3. Select data type you want to scan
In the new windows, you will see many data like photo, video, sms, contacts, ducument, audio and others, just tick "Audio", then tap "Next", the software will start to analyze your phone.

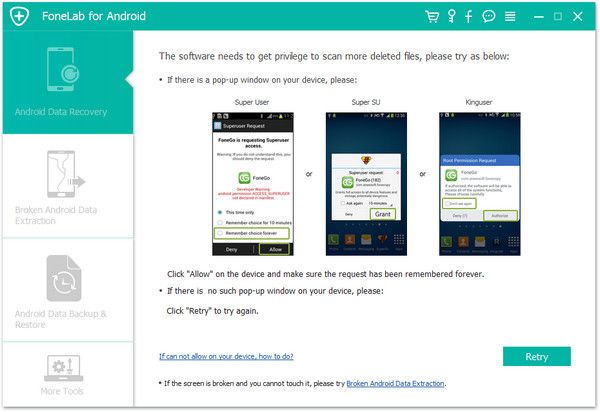
Step 4. Get authority to scan
Now you will see a request appearing on your Android phone, click "Allow/Grant/Authorize" to allow the apps to get the authority to scan your phone and the software will root your android. After that, your Android phone is going to be scanned.
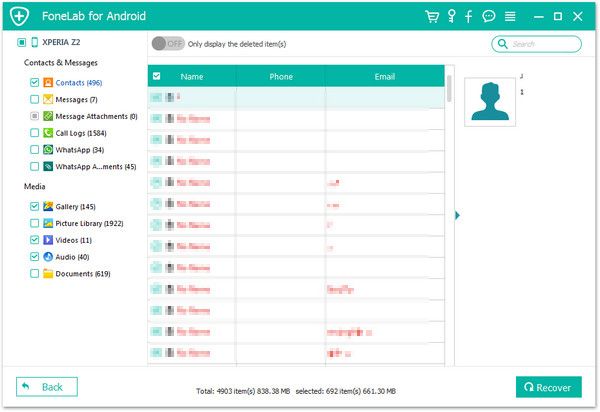
Step 5. Preview and recover your audios
When the scanning is over, you can free to view and check each audios on the right panel of the software, preview detail information for audios and choose the music you want, click "Recover" to save them on your computer.